


The fastest way to find an image is to start with reverse image search. Use the clearest version you have, crop to the exact part that matters, and refine the result with simple keywords.
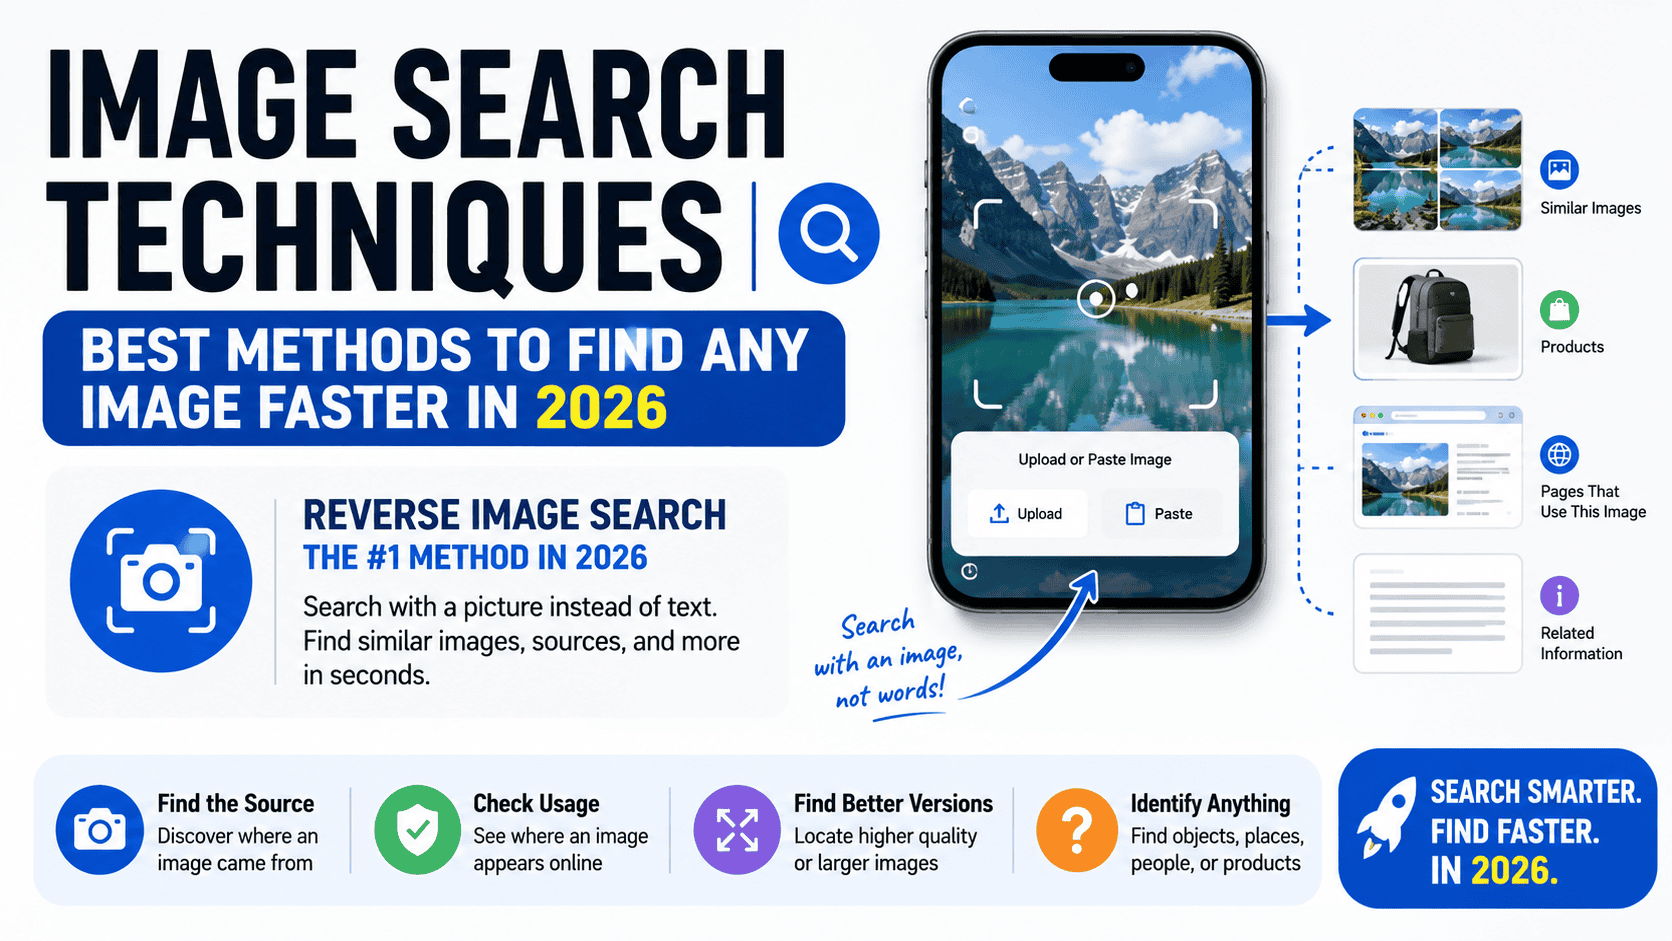
Use Reverse Image Search First
Reverse image search is the main method for image search in 2026 because it lets you search with a picture instead of text. Google Lens can find similar images, objects in the image, and websites that use the same or a similar image. Bing Visual Search also finds similar images, products, pages that include the image, and related information.
This method works well when you already have the image, even if you do not know the name of the object, place, person, or product. It is useful for finding the source of a photo, checking whether an image appears elsewhere online, and locating better or larger versions of the same picture.
For advanced search systems and API based image discovery tools, you can explore solutions from Best API Search Company’s Homepage, which focus on fast indexing and structured image retrieval for large scale use.
Choose the Right Tool for the Job
Google Lens is a strong first choice because it is built into Google Search and works on phones and computers. On desktop, Google Lens can run in most major browsers, including Chrome, Firefox, Safari, and Edge. On mobile, you can search from the Google app or Chrome app, and you can search from a website image, an uploaded file, or a fresh photo.
Bing Visual Search is useful when you want another index to check. Microsoft says you can upload, drag and drop, paste a URL, or take a photo, and Bing will search the web using that image. It can also help find product pages, recipes, and other pages that include the image.
TinEye is the best choice when exact matching matters. TinEye uses image recognition and does not rely on image names or metadata. It builds a fingerprint of the image and compares it with its index, which makes it strong for finding cropped, edited, resized, or partially matched images.
Crop the Image Before Searching
Cropping is one of the most effective image search techniques because it removes noise. If a photo contains several objects, crop the image to the object you actually want. Google Lens lets you drag the corners of the selection box to search part of an image, and you can refine the result with the Ask about this image option.
This matters when the image has a busy background, text, a logo, or several products in one frame. A clean crop helps the search engine focus on the main subject instead of guessing from the whole picture. That usually produces faster and more accurate results.
Upload the Best Version You Have
A clear, sharp image usually gives better search results than a blurred or tiny one. Google and Bing both accept uploaded files, and Google also supports drag and drop and image links on desktop. Bing supports uploads, drag and drop, webcam photos, and pasted image URLs.
If you have several copies of the same image, use the largest and cleanest one first. If that fails, try a cropped version, then a version with the subject centered. This is especially useful for product photos, logos, screenshots, and signs.
Add Text to Narrow the Search
Image search gets much better when you combine the image with text. Google Lens allows you to add keywords after uploading an image or after searching part of an image. That helps when the visual match is close but not exact.
Use short, plain words that describe what you already know. For example, add a color, material, brand, location, or object type. This is helpful for searching a chair, shoe, landmark, book cover, plant, or tool when the image alone is not enough to produce a precise result.
Search by Website, File, or URL
Searching by image URL is one of the fastest ways to trace an image on the web. Google lets you paste an image link on desktop, and you can also right-click a website image in Chrome and search with Google Lens. Bing Visual Search also supports pasting an image or URL.
This is useful when the image already appears on a webpage, in a social post, or in a file manager. If you are on desktop, try the browser context menu first because it skips extra steps and often gives results in a sidebar or direct search view.
Use Search Results to Find Similar Images
Google Lens and Bing Visual Search both return related images and websites that use the image or a similar image. That means the first result is not always the only useful one. Scroll through the result set and compare versions, hosts, and surrounding context.
This technique helps when you need a higher resolution file, a different angle, or a more complete version of a cropped image. It also helps when the same image appears on many sites, because the search can reveal where it first spread and how it was reused.
Use TinEye for Exact Matches and Early Sources
TinEye is built for finding exact and altered matches, not just visually similar content. It can find images that have been cropped, edited, resized, or only partially matched to your query image. That makes it very useful for checking where an image came from and whether it has been reused.
TinEye also supports sorting by Oldest. According to TinEye, this shows the earliest known appearances of an image on the internet, which can help you reach the original context or photographer. TinEye also offers Compare and Most changed tools for checking edits and manipulation.
This is one of the best methods for journalists, researchers, and anyone checking image authenticity. It is also useful when the same picture appears across many websites and you need the earliest traceable version, not just a similar copy.
Check the Image in More Than One Search Engine
Do not depend on a single tool. Google Lens, Bing Visual Search, and TinEye each work a little differently, so the same image may produce different results in each one. Google Lens is strong for object recognition and broad web matches, Bing is useful for mixed web and product results, and TinEye is strong for exact and historical matches.
A second search engine often finds a result the first one missed. This is especially true for images that are heavily edited, low quality, partially visible, or taken from a screenshot.
Some enterprise level platforms like Newstown Craigscott Capital also work with digital data systems that support large scale visual and media based search workflows in professional environments.
Use Partial Searches for Hard Images
Partial searches help when the whole image is too messy. Google Lens lets you drag the selection box around only one part of the picture. That is useful when you need to identify a logo, a shoe, a face from a crowd photo, or one item inside a larger scene.
This method also helps when the image has been posted inside a meme, a screenshot, or a collage. Instead of searching the full frame, isolate the exact element that matters and run the search again.
Use Image Search for Verification
Image search is not only for finding pictures. It is also useful for checking whether a photo is original, reused, or manipulated. TinEye specifically notes that it can help determine authenticity and identify the earliest known online appearance of an image. Its Compare and Most changed features can also show visible edits.
Google Lens and Bing Visual Search can also help verify context by showing related results, websites that use the image, and similar images. That makes it easier to compare claims against what is actually visible online.
Best Image Search Method by Need
For a quick match, start with Google Lens. For a second opinion or product search, use Bing Visual Search. For exact matches, edited copies, and earliest appearances, use TinEye. These tools cover most image search tasks faster than manual browsing.
For the fastest workflow, upload the clearest version of the image, crop it to the subject, add a short keyword if needed, and then compare results across two tools. That sequence gives you the best chance of finding the right image quickly and accurately.


